
삶 가운데 남긴 기록 AACII.TISTORY.COM
IO(블로킹)기반 자바 네트워킹 본문
InetAddress
import java.net.InetAddress;
import java.net.UnknownHostException;

public class InetAddressEx {

	public static void main(String[] args) {
		try {
			InetAddress local = InetAddress.getLocalHost();
			System.out.println("호스트 주소: "+local.getHostAddress());

			InetAddress[] iaArr = InetAddress.getAllByName("www.google.co.kr");
			for(InetAddress remote:iaArr) {
				System.out.println("구글 주소: "+remote.getHostAddress());
			}
		} catch (UnknownHostException e) {
			e.printStackTrace();
		}
	}

}
ServerSocket과 Socket
ServerSocket클래스는 클라이언트의 연결 요청을 기다리면서 연결 수락을 담당하고 Socket 클래스는 실제 통신을 담당합니다.
ServerSocket이 연결을 수락하면 Socket을 생성합니다.
서버는 클라이언트가 접속할 포트를 가지고 있어야하며 이 포트를 바인딩 포트라고 합니다.
이 바인딩 포트는 ServerSocket을 생성할 때 지정해줘야 합니다.
ServerSocket 연결 수락
import java.io.IOException;
import java.io.InputStream;
import java.io.OutputStream;
import java.net.InetSocketAddress;
import java.net.ServerSocket;
import java.net.Socket;

public class ServerEx {

	public static void main(String[] args) {
		ServerSocket serverSocket =  null;
		try {
			serverSocket = new ServerSocket();
			serverSocket.bind(new InetSocketAddress("localhost", 5001));
			while(true) {
				System.out.println("연결 대기중");
				Socket socket = serverSocket.accept(); //클라이언트 연결 수락
				InetSocketAddress isa = (InetSocketAddress) socket.getRemoteSocketAddress();
				System.out.println("연결 수락: " +isa.getHostName());

				byte[] bytes = null;
				String message = null;

				InputStream is = socket.getInputStream();
				bytes = new byte[100];
				int readByteCount = is.read(bytes);
				message = new String(bytes, 0, readByteCount, "UTF-8");
				System.out.println("클라이언트로부터 받은 메시지:" + message);

				OutputStream os = socket.getOutputStream();
				message = "안녕. 클라이언트!";
				bytes = message.getBytes("UTF-8");
				os.write(bytes);
				os.flush();
				System.out.println("클라이언트로 데이터 보내기 성공");

				is.close();
				os.close();
				socket.close();

			}
		} catch (IOException e) {
			e.printStackTrace();
		}

		if(!serverSocket.isClosed()) {
			try {
				serverSocket.close();
			} catch (IOException e) {
				e.printStackTrace();
			}
		}
	}

}
클라이언트 연결 요청
import java.io.IOException;
import java.io.InputStream;
import java.io.OutputStream;
import java.net.InetSocketAddress;
import java.net.Socket;
public class ClientEx {
public static void main(String[] args) {
Socket socket = null;
try {
socket = new Socket();
System.out.println("연결 요청");
socket.connect(new InetSocketAddress("localhost", 5001));
System.out.println("연결 성공");
byte[] bytes = null;
String message = null;
OutputStream os = socket.getOutputStream();
message = "Hello. Server.";
bytes = message.getBytes("UTF-8");
os.write(bytes);
os.flush();
System.out.println("데이터 전송 성공");
InputStream is = socket.getInputStream();
bytes = new byte[100];
int readByteCount = is.read(bytes);
message = new String(bytes, 0, readByteCount, "UTF-8");
System.out.println("데이터 받기 성공");
os.close();
is.close();
} catch (IOException e) {
e.printStackTrace();
}
if(!socket.isClosed()) {
try {
socket.close();
} catch (IOException e) {
e.printStackTrace();
}
}
}
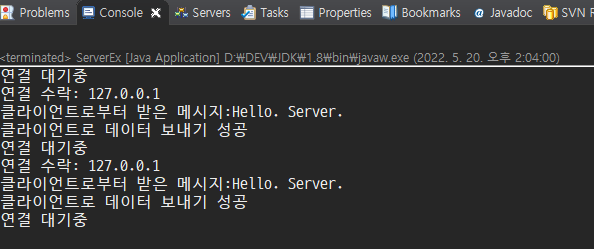
}실행 테스트 할 때 주의할 점은 ServerEx는 이클립스에서 먼저 실행한 상태에서 ClientEx를 나중에 실행시켜야 한다는 점입니다.
cmd 에서 ClientEx를 실행할 수도 있는데,
프로젝트 경로에 bin 폴더 아래에 컴파일된 class 파일들이 모여있는 것을 확인할 수 있습니다.
java 환경변수가 설정되어 있는 상태에서 cmd로 bin 경로로 이동한 후 java 패키지이름.ClientEx 를 실행하면 cmd에서 클라이언트 측 프로그램을 실행 할 수 있습니다.

"오류: 기본 클래스 ...을(를) 찾거나 로드할 수 없습니다." 라고 뜨는 경우
java 패키지경로.클래스이름 으로 실행해야 하므로 실행 경로를 class파일이 있는 경로가 아닌 패키지의 루트 경로로 이동한 뒤 실행해야 합니다.
스레드 병렬처리
ServerSocket과 Socket은 전송이 완료될때까지 다른 통신은 블로킹 되는 방식으로 동작하기 때문에 서버는 별도의 작업 스레드를 생성하고 여러 클라이언트와 병렬적으로 통신해야 합니다.
UDP
연결 절차를 거치지 않고 발신자가 일방적으로 데이터를 발신하는 통신 방식입니다.
TCP보다 빠르지만 패킷의 도착 순서를 알 수 없고 전송 신뢰성이 떨어집니다.
자바에서는 UDP통신을 위해 java.net.DatagramSocket과 java.net.DatagramPacket 클래스를 제공합니다.
아래 예제는 수신 예제 프로그램을 먼저 실행 한 뒤 송신 예제를 나주엥 실행해야 합니다.
송신
import java.io.IOException;
import java.net.DatagramPacket;
import java.net.DatagramSocket;
import java.net.InetSocketAddress;

public class UDPSend {

	public static void main(String[] args) throws IOException {
		DatagramSocket datagramSocket = new DatagramSocket();
		System.out.println("[발신 시작]");

		for(int i=1; i<5; i++) {
			String data = "message "+i;
			byte[] byteArr = data.getBytes("UTF-8");
			DatagramPacket packet = new DatagramPacket(byteArr, byteArr.length, new InetSocketAddress("localhost", 5001));

			datagramSocket.send(packet);
			System.out.println("[보낸 바이트]:"+byteArr.length+" bytes");
		}

		System.out.println("[발신 종료]");
		datagramSocket.close();
	}

}
수신
import java.io.IOException;
import java.net.DatagramPacket;
import java.net.DatagramSocket;

public class UDPReceive extends Thread {

	public static void main(String[] args) throws IOException, InterruptedException {
		DatagramSocket datagramSocket = new DatagramSocket(5001);

		Thread thread = new Thread() {
			public void run() {
				System.out.println("[수신 시작]");
				try {
					while(true) {
						DatagramPacket packet = new DatagramPacket(new byte[100], 100);
						datagramSocket.receive(packet);

						String data = new String(packet.getData(), 0, packet.getLength(), "UTF-8");
						System.out.println("[받은 내용 "+packet.getSocketAddress() +"]: "+data);
					}
				}catch (Exception e) {
					System.out.println("[수신 종료]");
				}
			}
		};
		thread.start();

		Thread.sleep(10000);
		datagramSocket.close();
	}

}
'DEV&OPS > Java' 카테고리의 다른 글
| NIO Buffer (1) | 2022.05.24 |
|---|---|
| NIO Path (0) | 2022.05.23 |
| 입출력 보조 스트림 (1) | 2022.05.19 |
| 파일 입출력 (0) | 2022.05.18 |
| 자바 콘솔 입출력 (0) | 2022.05.17 |